
Server Security is something an exception. One day or another, your server will be attacked and the integrity of your data will be at risk, that does not mean you will lose the current and existing customers in the process. cPanel provides easy access to your search and accessibility, user-friendly interface for managing your website. However, it is subject to various security issues, such as any server application or environment. As a responsible webmaster or server admin, you’re caught up to identify these issues and take steps to hack some loopholes to access your server or website.
A cPanel server can be secured by many means. For an easy setup and understanding I have categorized things in below manner. We can start with updating cPanel to latest version.
1. Keep cPanel up to date
For every outdated application there will be a chance of greater vulnerability, for overcoming this issue we need to make sure that you have the latest version of cPanel running. You can simply update cPanel by running below command on the command line.
# /scripts/upcp --force
If you are not familiar with command line, you follow below steps
Login into WHM > Software > Update Server Software > Proceed
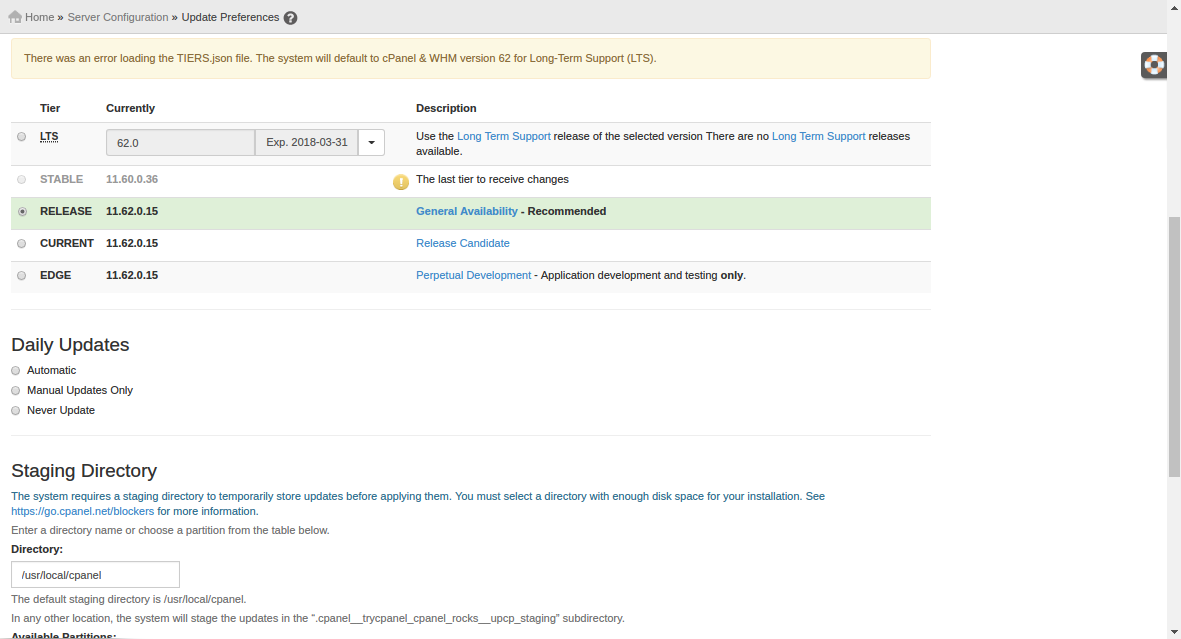
Also I recommend you enable daily updates by going to WHM > Server Configuration > Update Preferences & Save
2. MYSQL Hardening
Set MySQL password
(Don’t set the same password like for the root access)
-If you didn’t set MySQL password someone will be able to login into the DB with
username “root” without password and delete/edit/download any db on the server.
Disable symlinks from database
The MySQL database starts up by default permitting the usage of symlinks. When a table that is using symlinks is dropped, both the symlink and the file to which the symlink points are dropped.
An unauthorized user can create symlinks within a table that point to key configuration files and then drop the table.
Solution:
Edit /etc/my.cnf file and use –skip-symbolic-links option to disable symlinks. After save changes restart mysql service with below command.
# service mysqld restart
Remove unwanted database user account
There are default anonymous user accounts which are created when MySQL is initially installed. These user accounts have no password by default. A strong password must be set or these accounts removed.
An unauthorized user who discovers that a MySQL server is running can directly log in to the server without entering a password.
Solution:
Remove the anonymous account or set a strong password for it:
# mysql -u root -p
mysql> DELETE FROM mysql.user WHERE User = '';
mysql> FLUSH PRIVILEGES;
Rename the administrator account
The administrator account in MySQL is called root. This must be renamed to something different.
Malicious user can try to compromise the system using root account. The effort involved in trying to brute force a MySQL password is reduced because the attacker already knows the username.
Solution:
Rename the root account to something else using the following query.
mysql> update user set user='mydbadmin' where user='root';
mysql> flush privileges;
Enable logs in mysql server
Enabling logging will help administrators to monitor critical events in a MySQL server.
Malicious activities will not be detected. Early warning towards attempts at malicious access will go undetected.
Solution:
Mysql has different types of logs. You can enabled it by adding lines in /etc/my.cnf file.
log-error=/var/log/mysqld.log
log-slow-queries=/var/log/mysql-slow.log
long-query-time=1
Remove unused database from the server
There is a default database that comes preinstalled with MySQL. This database should be removed if not required.
An unauthorized user can access sensitive information stored in this database.
Solution:
Remove the preinstalled database “test” if it is not required. It can be removed as follows:
mysql> drop database test;
Mysql should be run on non default port
Mysql runs on default 3306 port the configuration should be change to run mysql on different port.
The port will be detected as open by a port scanner by an Hacker. By this information Hacker can steal more information about mysql server.
Solution:
You can change port from mysql configuration file /etc/my.cnf. You can set different not default port, for example 5532.
3. PHP Hardening
Type php –ini in command line to show the configuration file of php
Configuration File (php.ini) Path => /usr/local/lib
Loaded Configuration File => /usr/local/lib/php.ini
We should edit in /usr/local/lib/php.ini
php .ini & disabled functions
safe_mode = On
Safe Mode is off by default.
Safe Mode does a user check on files that are opened by a process. By default, the users of the file and the process need to match.
expose_php = Off
Setting expose_php = Off just prevents the webserver from sending back the X-Powered-By header.
Potential hackers could look for out of date versions of PHP with security holes to exploit, they could potentially do the same even if the header was turned off
Enable_dl= Off
The configuration directive enable_dl instructs PHP whether or not to enable dynamic loading of PHP modules with dl().
If you enable dynamic module loading, it’s possible to bypass the safe_mode restrictions. Dynamic loading is enabled by default.
magic_quotes = On
It helps to escaping special characters with a ‘\’ to allow a string to be entered into a database. This is considered ‘magic’ because PHP can do this automatically for you if you have magic_quotes_gpc turned on.
NOTE: This feature has been DEPRECATED as of PHP 5.3.0 and REMOVED as of PHP 5.4.0.
register_globals = off
register_globals is an internal PHP setting which registers the $_REQUEST array’s elements as variables. If you submit a value in a form, via POST or GET, the value of that input will automatically be accessible via variable in the PHP script, named after the name of the input field.By Default they have register_globals=on,better to turn it off
display errors = off
This option will helps to not display error on the webpage,so that the others cant find any vulnerabilities.
disable_functions = system, show_source, symlink, exec, dl,shell_exec, passthru, phpinfo, escapeshellarg,escapeshellcmd
According to several Security Websites administrators are strongly encouraged to disable some dangerous php-functions which can be used to exploit several php-installations and software. To protect yourself we encourage you to disable whenever possible the following functions!
# service httpd restart
4.Apache Hardening
Hide Apache Version
To prevent Apache to not to display these information to the world, we need to make some changes in Apache main configuration file.
Open configuration file with vi editor and search for “ServerSignature“, its by default On. We need to Off these server signature and the second line “ServerTokens Prod” tells Apache to return only Apache as product in the server response header on the every page request
ServerSignature Off
ServerTokens Prod
# service httpd restart
or
You can also change this option by going WHM >> Service Configuration >> Apache Configuration >> Global Configuration & Click Save

Disable Directory Listing
By default Apache list all the content of Document root directory in the absence of index file
We can turn off directory listing by using Options directive in configuration file for a specific directory. For that we need to make below entry in httpd.conf
<Directory /var/www/html>
Options -Indexes
</Directory>
Use Allow and Deny to Restrict access to Directories
We can restrict access to directories with “Allow” and “Deny” options in httpd.conf file.
<Directory />
Options None
Order deny,allow
Deny from all
</Directory>
Options “None” – This option will not allow users to enable any optional features.
Order deny, allow – This is the order in which the “Deny” and “Allow” directives will be processed.
Here it will “deny” first and “allow” next.
Deny from all – This will deny request from everybody to the root directory, nobody will be able to access root directory.
Use Mod Security to Secure Apache
Mod Security works as a firewall for our web applications and allows us to monitor traffic on a real time basis. It also helps us to protect our websites or web server from brute force attacks.
Install mod_security
# yum install ea-apache24-mod_security2
# service httpd restart
Installing mod_security is can be done within a few minutes with few changes to existing infrastructure.
You can enable it from Easy Apache configuration.
Also malware.expert is providing advanced Mod_Security rules for Webhosting, which are based on intelligence gathered from real-world investigations, penetration tests and research data in the REAL LIFE environment of over 10 000 domains. These rules are developed over ten years with the help of real traffic to websites.
5. SSH Hardening
Changing SSH port to custom
Open the ssh configuration file : /etc/ssh/sshd_config
When someone tries to attack the first thing they will be trying to attack on the default ssh port which is 22 .So we have to change it a custom one .
Port 1313
Here I have set the ssh port to 1313
open the port that you are setting up for SSH in your firewall.
PermitEmptyPasswords no
SSH access without password will be avaialble which is a securtity threat .
PermitRootLogin no
It is always desired to restrict direct root access .You can ssh to server with custom user and gain root access with sudo .
After editing changes in configuration file ,restart the service
# service sshd restart
6. CSF Hardening
CSF is commonly used firewall that provides a good level of protection with easy to manage commands. Here are the following steps to install and configure CSF :
# cd /usr/local/src/ # wget&amp;nbsp;http://www.configserver.com/free/csf.tgz # tar -xzf csf.tgz # cd csf # ./install.sh
After installation we have to make few tweaks in CSF configuration file which is located at : /etc/csf/csf.conf
In CSF,for a basic security, stability and settings check on the server we need to performed this actions in configuration file,
-Disable testing
-Change security warning restrict_syslog to 3
-Restrict syslog/rsyslog access to
-SMTP_BLOCK = 0 to 1
-LF_SCRIPT_ALERt =0 to 1
-SYSLOG_CHECK  = set to 300
-PT_ALL_USERS = set to 1
-Local-infile=0 in mysql configuration file.
-Change ssh port number to 1313
-Disable PasswordAuthentication
-Enable shell Fork Bomb Protection Whm-security-Shell Fork Bomb-enable
-Enable each item in the WHM > Background Process Killer
-Create the file /root/.forward, and add  email address in it
-WHM-Edit System Mail Preferences-Forward mail for “root” to:email address
-Set apache  TraceEnable = off and rebuilded configuration
-Change WHM - Apache Configuration - Global Configuration - ServerTokens - ProductOnly in apache configuration
-Change WHM - Apache Configuration - Global Configuration - FileETag - None in apache configuration
-Change WHM - Security Center - mod_userdir Tweak in apache configuration
-Change php version to latest version for more security
easyapache-nextstep-php version selection-save and build
-Modify /usr/local/lib/php.ini and set:
enable_dl = Off
-Disable abused php functions in php configuration file
-Enable php open_basedir Tweak
-WHM - Security Center - php open_basedir Tweak
-Redirected to ssl
WHM > Tweak Settings > Always redirect users to the ssl/tls ports when visiting /cpanel, /webmail.
-Disable WHM - Tweak Settings - BoxTrapper Spam Trap
-Set  value for WHM - Tweak Settings -the maximum mail can send out per hour by domains= 20
-Disable compilers WHM - Security Center - Compilers Tweak
-WHM - FTP Server Configuration - Allow Logins with Root Password - No
-WHM - Tweak Settings - Allow Creation of Parked/Addon Domains that resolve to other servers
-Disable WHM - Tweak Settings - Allow users to Park/Addon Domains on top of domains owned by other users
-Disable WHM - Tweak Settings - Proxy subdomains.
WHM - Tweak Settings - Accounts that can access a cPanel user account set to user only
-Enable WHM - Tweak Settings - Blank referrer safety check
-Enable WHM - Tweak Settings - Referrer safety check
-Enable WHM - Tweak Settings - Hide login password from cgi scripts
-Disable WHM - Security Center - SMTP Restrictions and use the csf configuration option SMTP_BLOCK instead
-Stop and disable portreserve

Your Score: 138/142*(you will get a score according to the security you have done in csf)
After saving changes restart csf
# csf -r
7. Kernel Hardening
Open /etc/sysctl.conf using vi editor
/etc/sysctl.conf file is used to configure kernel parameters at runtime. Linux reads and applies settings from /etc/sysctl.conf at boot time.
Turn on execshield
kernel.exec-shield=1
kernel.randomize_va_space=1
ExecShield is security Linux kernel patch to avoid worms and other problems
Enable IP spoofing protection
net.ipv4.conf.all.rp_filter=1
The spoofing protection prevents your network from being the source of spoofed.
Forged communications that are often used in DoS attacks
Disable IP source routing
net.ipv4.conf.all.accept_source_route=0
These commands disable forwarding of IPv4 packets on all interfaces
net.ipv4.icmp_echo_ignore_broadcasts=1
net.ipv4.icmp_ignore_bogus_error_messages=1
These command disable ping on the server.
Make sure spoofed packets get logged
net.ipv4.conf.all.log_martians = 1
These option enables Martian packet logs
8. DNS Hardening
To hide BIND version
# vi /etc/named.conf
version "BIND";
instead of bind you can give your message so as to hide the DNS version .
Turn off recursion
# vi /etc/named.conf
recursion no;
This will stop recursive queries from the DNS server
9. FTP Hardening
To disable anonymous logins
# vi /etc/pure-ftpd.conf
Allow Anonymous Logins No
Allowing anonymous FTP logins in generally considered to weaken the security of the server. Setting this option to “No” is recommended.
To disable anonymous uploads
Allow Anonymous Uploads No
Allowing anonymous FTP uploads in generally considered to weaken the security of the server. Setting this option to “No” is recommended.
Setting FTP Maximum number of connection at a time
Maximum Connections 30
Maximum number of FTP connections to accept.
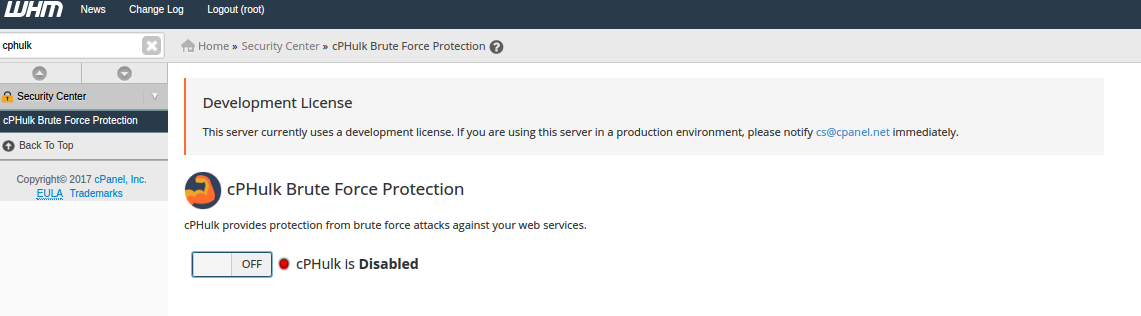
10. Enable cpHulkd
To enable cphulk run this commands on command line
# /usr/local/cpanel/etc/init/startcphulkd
# /usr/local/cpanel/bin/cphulk_pam_ctl --enable
# mysqlcheck -r cphulkd
Or
You can also change this option by going WHM >> Security Center >> cPHulk Brute Force Protection & change from OFF to On.
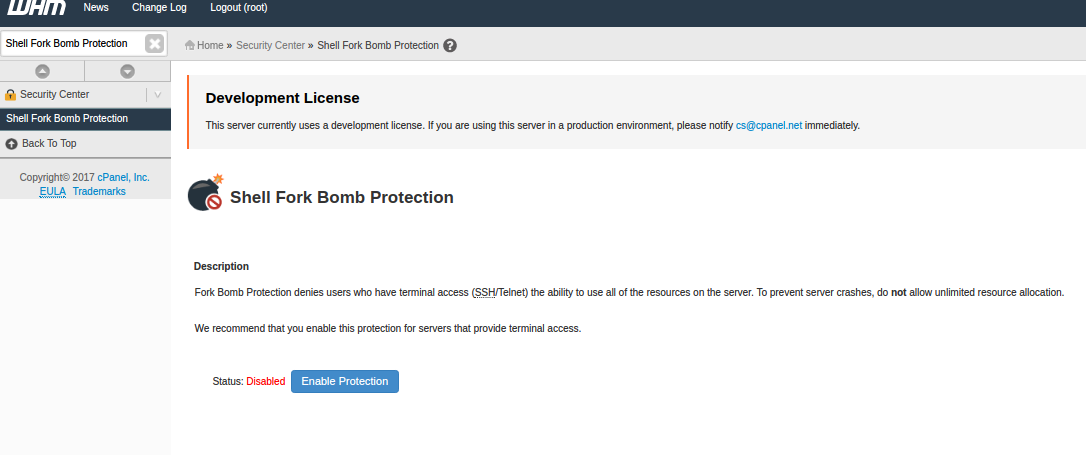
11. Enable Shell Fork Bomb Protection on cPanel server
Fork Bomb Protection denies users who have terminal access (SSH/Telnet) the ability to use all of the resources on the server.
Login to WHM and click on “Shell Fork Bomb Protection” under “Security Center”. Click on “enable protection” to enable Shell Fork Bomb Protection.
12. Harden /tmp directory
Hardening tmp plays a big role in safeguarding your server from external attacks. All applications use the /tmp directory to temporarily store data. If /tmp are not secure, there is a chance to attack the server using Trojans. Temp hardening restricts all activities in / tmp. This prevents the attacker from enforcing the code in the /tmp folder.
a. Create a file size 512 MB or more for /tmp
# dd if=/dev/zero of=/var/TMP bs=1024 count=524288
b. Make it ext3
# mke2fs j /var/TMP
c. Backup the original /tmp
# mv&amp;nbsp; /tmp /tmp_backup
d. Create new /tmp folder
# mkdir /tmp
e. Mount the new temp file to /tmp
# mount -o loop,noexec,nosuid,rw /var/TMP /tmp
f. Set Permission of /tmp
# chmod 1777 /tmp
g. Restore original /tmp and delete the Backup
# cp -R /tmp_backup/* /tmp/
# rm -rf /tmp_backup
13. Installing Rkhunter
Rkhunter (Rootkit Hunter) is an open source Unix/Linux based scanner tool for Linux systems released underGPL that scans backdoors, rootkits and local exploits on your systems. It scans hidden files, wrong permissions set on binaries, suspicious strings in kernel etc.
a. Download the stable version of Rkhunter
# cd /tmp # wget&amp;nbsp;http://ncu.dl.sourceforge.net/project/rkhunter/rkhunter/1.4.0/rkhunter-1.4.0.tar.gz
b. Run the following commands as a root user to install it.
# tar -xvf rkhunter-1.4.0.tar.gz
# cd rkhunter-1.4.0
# ./installer.sh --layout default --install
c. Create a file called rkhunter.sh under /etc/cron.daily/, which then scans your file system every day and sends email notifications to your email id. operate with vi editor
# vi /etc/cron.daily/rkhunter.sh
d. Add the following lines of code to it and replace “YourServerNameHere” with your “Server Name” and “your@email.com” with your “Email Id“.
#!/bin/sh
(
/usr/local/bin/rkhunter --versioncheck
/usr/local/bin/rkhunter --update
/usr/local/bin/rkhunter --cronjob --report-warnings-only
) | /bin/mail -s 'rkhunter Daily Run (PutYourServerNameHere)' your@email.com
e. Set execute permission on the file.
# chmod 755 /etc/cron.daily/rkhunter.sh
f. To scan the entire file system, run the Rkhunter as a root user.
# rkhunter --check
14. Kill unwanted Background Process
There is lot of unnecessary process running on linux server which will slow down the server, we can run the below commands in terminal to stop them all
# echo "ptlink" >> /var/cpanel/killproc.conf
# echo "psyBNC" >> /var/cpanel/killproc.conf
# echo "ircd" >> /var/cpanel/killproc.conf
# echo "guardservices" >> /var/cpanel/killproc.conf
# echo "generic-sniffers" > /var/cpanel/killproc.conf
# echo "eggdrop" >> /var/cpanel/killproc.conf
# echo "bnc" >> /var/cpanel/killproc.conf
# echo "BitchX" >> /var/cpanel/killproc.conf
15. Disable Compiler Access
Compiler Access is used to gain access C or C++ compiler on the server.It is recommended to disable this compiler as Disabling these compilers will result in a more secure server as most of the attacks require a working C or C++ compiler on the server.
Run the command in terminal
# chmod 750 /usr/bin/gcc /usr/bin/i386-redhat-linux-gcc
# chown root:compiler /usr/bin/gcc /usr/bin/i386-redhat-linux-gcc
Install cPguard Plugin – A Complete server security suite
If you are lazy in doing a setup for all the above hardening, you can install cPguard, which is all in one security plugin with artificial intelligence. cPguard security plugin offers fast, light and intuitive protection against viruses and attacks giving you the best protection that’s easy to use and won’t affect server performance.
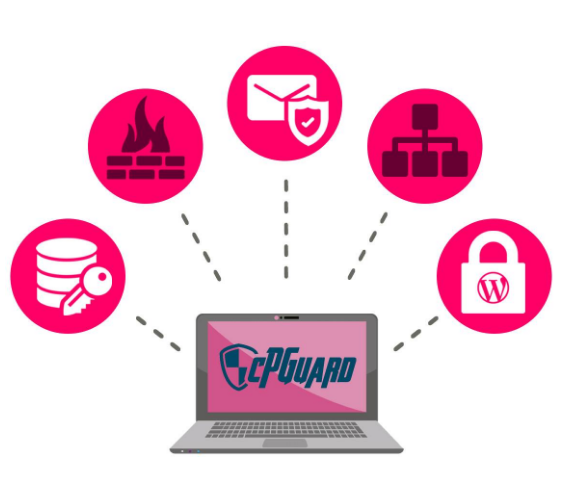
Plugin contains ultimate security solution for your Linux servers and has more advanced features than any other plugin that is available on the market now, some of the features are.
- Smart Antivirus
- Least resource demand
- Cloud based Auto Clean Malware (New)
- Easily customizable
- Realtime Anti spam with cPGuard Exim
- Domain Reputation powered by Google Safebrowsing
- DNSBL IP Reputation Check
- Customizable cPanel plugin
- Web Application Firewall
AND MANY MORE… You can find more information and features about the plugin from here.
Conclusion
In this Modern era, server without proper security will always pave the way for hackers to get into it. Once a server is hacked we are unable to find what all harmful contents are uploaded to the server, if it happens the only solution left is to migrate all the server contents to a new server and it anyway consumes some time and treasures. The smartest thing you can do is implement proper security measures for cPanel as soon as your hosting account is set up.
For more server security tips and tricks, click on subscribe.